We were all in the situation where a program needs more time to load into memory, thus executing more slowly. If, for a second, you sit and think about what happens when we double click an icon, we understand that to run a program, your computer must allocate resources. First, the essential components of a program are taken from the hard drive and go directly to the short-term RAM memory. In here the information can be accessed much faster than the hard disk. But who coordinates all this activity? As you probably imagined, this is a task of the CPU, which is in control of each operation.
Because of the aspects mentioned above, one thing is clear. If we can make the CPU spend more time on the execution of a certain program, then we would definitely make this program more efficient in terms of the running time. When it comes to CPU, Windows is a little more reserved and operates on a set of priorities that define and allocate a certain fraction of the CPU depending on the level of priority of each task being executed on the machine. In total, there are six priority levels: Low, Below Normal, Normal, Above Normal, High and Realtime, gradually climbing to the highest level.
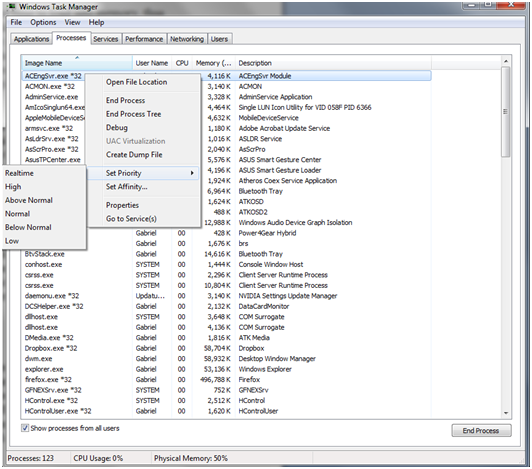
Most programs are executed under the Normal level of priority, which is a level that tells the CPU to allocate a normal fraction of its time for executing it. If you’re wondering how you can find out what level of priority is assigned to each program the answer is very simple. For this you only need to enter Task Manager, select a task, right-click on it and go to ‘Set Priority’. In the same menu you can select the priority you want for a certain task running on your machine, as shown below:

Priority levels for the CPU
As you can guess, the method above can be used to speed up the execution of a certain program by changing its priority. Of course, if you want a program to run faster then you just need to set a higher level of priority. The general suggestion is to select Above Normal and High, because Realtime will consume a lot of CPU time and may be affecting the other programs. Furthermore, it is only advisable to change priorities for a few programs that are already open and be very careful in the long run. The same effect can be achieved directly from the command prompt by typing a command like:
start / priority program_name
Where ‘priority’ can be replaced to any of the values mentioned above, while ‘program_name’ is the name of the program to be changed. For example, if you want to execute Notepad in High Priority mode you would need to type.
start / high notepad
Finally, if you want a particular program to run under a certain priority level all the time, without the need to change this level manually, you need to create a shortcut with the following path:
C: Windows System32 cmd.exe / c start “notepad.exe” / HIGH / AFFINITY 3 “C: Windows System32 notepad.exe”
The example above is for notepad and needs to be adapted for every program.


