HomeGroup is a feature introduced by Windows 7 which aims to simplify the process of sharing content and devices on your home network. In older versions of Windows, sharing content was often a long and cumbersome process, especially for novice users. By using HomeGroup, you can now access all shared content on your network with a single click. This tutorial will show you what a HomeGroup is, as well as how it works and how you can create one at your home.
What is a HomeGroup
HomeGroup is a feature available to computers connected to a home network. Every time you connect your computer to a new network, Windows 7 asks you to input the type of the network. If you select “Home network” this means that you are in a known secure network and Windows 7 will allow you to use the HomeGroup feature. This allows all computers with Windows 7 to easily connect to each other and share content.
To be more precise, all computers with Windows 7 HomeGroup are the same, they share files, folders, devices and media streams without the need to enter passwords every time you want to access something, as it happened with earlier versions of Windows. You can click on each computer you want to share content with and everyone can access the content with just a few clicks.
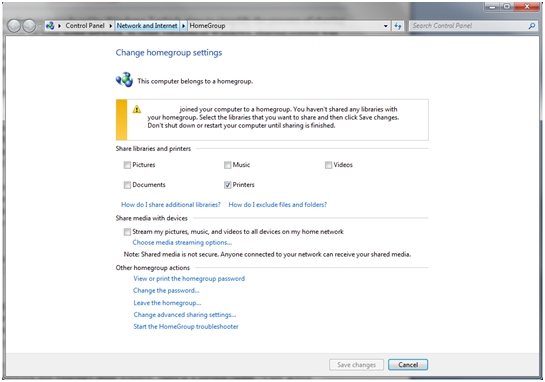
To access the control panel HomeGroup go to “Control Panel -> Network and Internet -> HomeGroup”. This will take you to a window similar to the following one:

Note that the HomeGroup feature is not available on public of office networks and does not work for computers that have Windows 7 installed, even if they are part of the same network. Home groups can only be created between computers with Windows 7.
How to create a HomeGroup
First, we must open the Network and Sharing Center. In the Network and Sharing Center window, there is a section called “View active networks”. Here you see the networks you are connected to, along with their type and if they are associated with a HomeGroup. If there is no defined HomeGroup network, you will see a line that says “Homegroup: Ready to create”. Click this link to create a HomeGroup.
The next step is to choose what you share. You will see only a limited list of libraries: images, documents, music and video files, as shown in the image above. One thing to note is that at this step you can only share libraries and printers
After a few seconds, Windows 7 will show the HomeGroup password. Unfortunately, it cannot be changed at this point. If you want to change a HomeGroup password you can do this a little later, so it is useful to write it down somewhere. You can press Finish.
Once you get used to how a HomeGroup works, you will be convinced of the fact that this is a feature of Windows 7 which greatly simplifies the process of sharing content between devices from your home. With HomeGroups home networking is now much easier and more efficient.


